Monday 21 March 2016

Viking Braids?! How to rock your ponytail


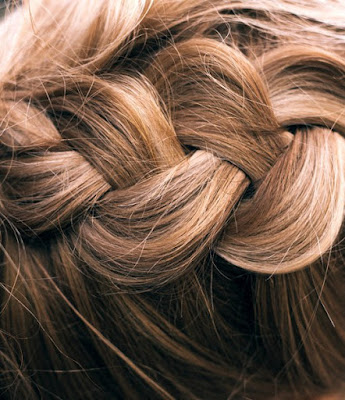
The era of everyday boring hair is officially over!!! Why? It's because I'm gonna show you how to create a trendy, catchy, but still simple hairstyle, just rocking a traditional ponytail with some 'viking' braids. 
Interested? Then keep on reading ;)


Искренне люблю и ценю моменты, когда в жизни встречаются светлые, открытые, безумно талантливые люди. Люди, которые находятся с тобой на одной волне, верят в тебя и доверяют тебе себя)
Одной из таких людей оказалась прекрасная Стеша Виноградова, "поэтесса, блогер, путешественница, мечтательница и основательница DIALOGUES") Именно она стала моей моделью для новой идеи нескучного хвоста с боковым плетением. 
Обязательно посетите ее блог, чтобы увидеть полный лук, почитать ее размышления на тему умения ценить настоящее, и еще много-много интересного)


Supplies:

  • hair brush
  • clear elastics
  • bobby-pin

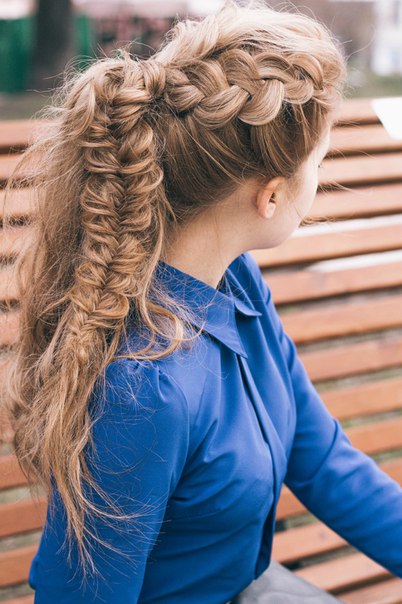
- Take a curved section on the right (1/3 of the head) from top of the eyebrow to behind the ear, slightly into the nape. Clip away the rest of the hair.

- Create a Dutch braid with this section, beginning at the front hairline until you reach just behind the ear, leaving plenty of length out, then secure it with an elastic.


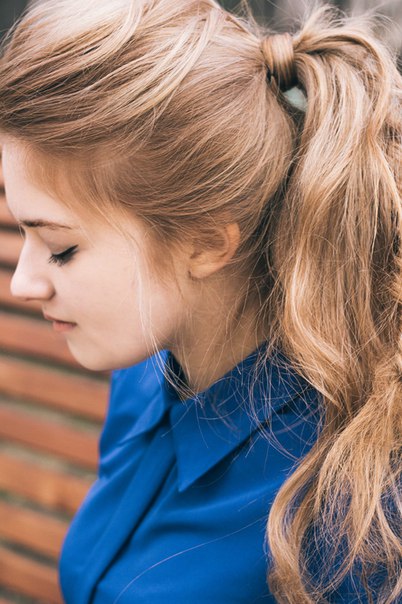
- Place the rest of your hair into a mid-height ponytail. 

- Next, you will pancake or pull apart the Dutch braid to make it appear thicker and flatter against the head. After you pull the braid apart, secure the braid to your existing ponytail.


- Pick up a medium section of hair in the ponytail and instead of finishing with a traditional braid, create a simple fishtail braid, leaving out 2-3" at the end. Secure with an elastic and then gently pull the fishtail braid apart to your liking.

- Curl the rest of the ponytail then use your hands to break the curls apart and create more texture.


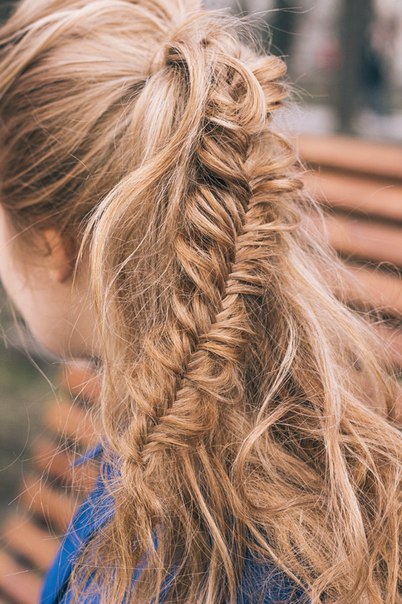
- Сделайте глубокий пробор справа и отделите всю височно-боковую зону. уберите остальные волосы,закрепив зажимом.

- Из выделенной секции начинаем заплетать датскую косу, по направлению от виска к затылку. Когда коса выйдет немного за пределы уровня уха, закрепляем ее резинкой.

- Сделайте обычный средней высоты хвост из остальных волос.


- Повытягивайте пряди косички, чтобы она казались объемнее, и прикрепите ее к хвосту с помощью резинки.

- Выделите среднюю прядь из хвоста и заплетите косу "рыбий хвост", недоплетая сантиметров 8. Закрепите и аккуратно повытягивайте пряди.

- Накрутите оставшийся хвост на плойку и, с помощью рук, разбейте локоны, придавая им текстуру и делая их небрежными. 
  

Thanks for reading! See you soon ;)

Wednesday 16 March 2016

Простые прически за 5 мин.

"Мама, я в телевизоре!" А точнее, на YouTube! 


Серьезно решив захватить видео-блогосферу, я пополнила ряды команды канала "Школа красоты" и теперь раз в неделю буду радовать вас (или огорчать)) видео-уроками различных причесок.

Первое видео с тремя очень простыми и быстрыми прическами самостоятельно уже ждет вас на канале.

Комом ли первый блин, решать вам) По-этому, не забывайте оставлять в комментариях свои отзывы и советы, и приятного просмотра ;)


Friday 11 March 2016

"Long live our noble Mother Monster!": Lady Gaga's Style Influence


Singer, songwriter, actress. She is more than that! Lady Gaga is a phenomenon (in the broadest sense of the word) which excites the minds and imagination of millions since 2008.


Lady Gaga, Mother Monster, New Queen of Pop - she rightfully merited all these titles for her significant impact on the international pop music and fashion. 


Playing with the edge, pushing the boundaries and shocking people with her eccentric individuality, her fearlessness and absolute undeniable creativity, she became an officially recognized style icon (in 2011 on CFDA) and made "the outrageous" as new fashion trend.


Such famous brands as Alexander McQueen, Versace, Marc Jacobs are constantly draw inspiration from her scenic images.
As designer Karl Lagerfeld once said: "Gaga gives the world her music and her talent, but the thing I like most is that she fights against boredom and banality. She also puts forth an ever-changing, inspiring, and strong image - an image beyond fashion."


In her turn, Lady Gaga doesn't hide that her style was created under the influence of other bizarre celebrities such as Freddy MercuryMichael Jackson, MadonnaDavid Bowie (remember her spectacular tribute to David Bowie at the 2016 Grammys?).


Her on stage costumes are always the most outrageous and visually captivating pieces, providing the design backbone to all her shows. The infamous meat dress she wore to the 2010 MTV Music Awards, Gareth Pugh-designed winged costume for her performance on the X Factor 2009, a pyrotechnic bra at the Much Music Video Awards in 2009, are only a smallness from the huge list.


Of course, Lady Gaga’s unique fashion sense doesn't just extend to her wardrobe. She changes her hairstyles as quickly and radically as her outfits. A natural brunette, Lady Gaga dyes her hair platinum blond, but frequently tints parts of it with crayon colors. She's turned it into an actual hair bow, a sun hat, and countless other shapes. 
She is actively using wigs and hairpieces, unusual and extraordinary hair accessories. Her intricate hairstyles are often supplemented with unimaginable hats or veils.


Makeup in Lady Gaga's style - is always a bright lipstick, eyeliner, false eyelashes, bright eyeshadows, with feathers and crystals on the face and lips, and even the prosthetic pyramid horns she wears grafted onto her skin.


Summing up all of the above, we can say that Lady Gaga is a storehouse of inspiration. And no matter, like her or not, you can't remain indifferent to Lady Gaga's looks. Lets hope she will carry on to inspire and empower people around the world with her style and flair )

In anticipation of Lady Gaga's thirtieth, I decided to recreate some of my favourite stunning looks from her music videos and TV series.


"Born This Way"


"Marry the Night"


"Judas"


American Horror Story: Hotel (The Countess) 


 "Be yourself, wear what you would like 
and don't afraid to stand out" 
(Lady Gaga)


Friday 4 March 2016

Every Queen Needs a Crown: 2 Crown Braids Hairstyles

Finally, spring is here!!! Yet the weather is unaware of it :( It's constantly raining, and altogether, it's damp and cloudy here, in Kyiv. So tell me, what kind of festive spring mood can we talk about???

But hey, it is in our power to cheer up and change everything for the better by using one simple thing - hairstyle! )
And today, I prepared for you some new step-by-step tutorials for 2 Crown Braids Hairstyles that'll help you forget all the troubles and feel yourself like a queen


Я - Женщина, а значит - красота
И шарм, и грация, и нежность тела,
И ум, и ласка, а ещё - мечта.
Я - Женщина, а значит - Королева! (с)


В преддверии нашего профессионального женского праздника - 8 Марта, каждая из нас просто обязана выглядеть по-королевски. И, конечно, здесь не обойтись без соответствующей короны
Именно поэтому, я подготовила для вас пошаговые инструкции к двум разновидностям причесок-корон, которые сделают вас звездой любого мероприятия.


1. Crown Braid

Supplies:
  • hair brush
  • clear elastics
  • bobby-pins
  • hair accessories

1) Brush your hair and divide it into two sections

Расчешите волосы и разделите их на две части


2) Make two normal braids from each section

Из каждой части, заплетите две обычные косички


3)  Pull apart each individual piece of the braids to make them look much more voluminous

 Повытягивайте пряди, чтобы косички казались объемнее


4) Cross the braids at the back and place them like a crown, securing with bobby-pins

Теперь укладываем наши косички как ободок и, выбрав самое выигрышное положение, закрепляем их по всей длине невидимками


Our first crown braid is done! Now you can add some accessories (flowers, hair pins, hair band, combs) to make it more romantic. 

Можете также украсить эту прическу красивым обручем, шпильками, цветами.


2. Dutch Crown Braid

Supplies:
  • hair brush
  • clear elastics
  • bobby-pins
  • hair accessories

1) Brush your hair and divide it in the middle into two sections

Расчешите волосы и, сделав пробор посередине, разделите их на две части

    
2) Make two normal dutch braids from each section (cross the right strand under the middle, then the left under the right, always adding new strands from both sides)

Из каждой части, заплетите две обычные датские косички (расположите сначала правую прядь под левой, затем левую под правой,добавляя новые пряди с двух сторон)


3)  Pull apart each individual piece of the braids to make them look much more voluminous

 Повытягивайте пряди, чтобы косички казались объемнее


4) Cross the braids at the back and place them like a crown, securing with bobby-pins

Теперь укладываем наши косички как ободок и, выбрав самое выигрышное положение, закрепляем их по всей длине невидимками


And we're done with our dutch crown braid! Now you can add some accessories (flowers, hair pins, hair band, combs) to make it more unique, or leave it like that. 

Можете также украсить эту прическу красивым обручем, шпильками, цветами.


Hope you like this tutorials) Don't forget to leave the comments and to subscribe ;)

Я желаю вам быть на высоте и хорошо отпраздновать это 8 Марта!